Uploading Image Files From the Kodak DC240 Zoom Into a Computer

If you are using the Medical Staff Dell computer, get on with the job. But if you are doing this on a computer without the necessary software., first install the hardware and software.
  You may also wish to view the Camera Guidelines.


Connecting Up the Camera to the Computer

This assumes that you are either using the Medical Staff Dell Computer or have already connected the appropriate cable to your own computer.
 
  1. Take the camera end of the cable. The connector for the camera is rounded and looks like a PS/2 connector flattened on one side.


  2. End-on View of Connector
    By the way, these two photographs were taken with the Kodak DC240. Notice the rich colours and the fantastic detail.

    <----------------------------->

    Oblique View of Connector
    This is an end-on view of the connector which should be used to connect to the computer. Notice that the connector looks a bit like a PS/2 connector except that it is flattened on the side.

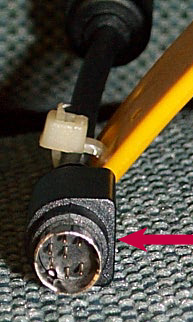
    The red arrow points towards the flat side of the connector which should be turned to face the back of the camera.


    This is an oblique view of the same connector.

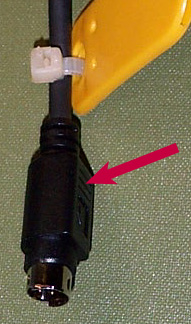
    Again, the red arrow points to the flat side of the connector which must face the back of the camera when inserting the connector.


  3. Make sure that the flat part of the connector faces towards the back of the camera. Open the bottom flap on the side of the camera covering the connection port. The correct flap has two small arrows pointing horizontally in opposite directions. Gently push the connector into the port. Do not use undue force. Make sure that the connector is well seated before continuing.
  4. Boot up the computer.
  5. Turn the Mode dial on the back of the camera to the Connect position. Turn on the camera by pushing the power switch on the camera to the right. An animated icon should appear in the top LCD panel of the camera.

Uploading Images into the Computer

  1. Double-click on Windows Explorer.
    1. Click on the + sign to the left of the folder labeled Kodak DC240_Images.
    2. Click on the + sign to the left of the folder labeled DCIM.
    3. A list of folders will now appear labeled 100DC240, 101DC240, 102DC240, 102DC240 and so on. Most commonly, only one such folder will appear.
    4. Click on the folder icon itself or its name and the list of images in that folder will appear in the right pane of Windows Explorer.
    5. Select the files you would like to transfer to the computer by using a combination of the Shift and Ctrl keys. Alternatively, select all the files in the folder by clicking anywhere in the right pane and then pressing Ctrl-A.
    6. Right-click on the selection and move the cursor to the Send To selection. After a second or two, a list of choices will appear to one side of the context menu. Left-click on the destination you would prefer to send the images to. There are tree relevant choices,
      1. 3 1/2 Floppy (A),
      2. Kodak DC240_Images, and
      3. Zip 100 MB (D). (This choice may not appear on your own computer unless you have made the necessary changes to include this option in your Send To folder. Obviously, if you don't have a Zip drive, this would be superfluous.)
    7. If you are using the USB connector, which is the one on the Medical Staff Dell computer, the transfer usually takes less than a minute but the normal serial connector easily takes ten times as long.
  2. You may now turn off the camera by pushing the power switch on the camera to the right again. The animated icon should disappear.
  3. The camera may now be disconnected at the camera end leaving the cable connected to the computer.
  4. If you have uploaded the images into the Staff computer, in order that your images will not get mixed up with images uploaded by other members, please immediately,
    1. transfer the files onto your own floppies or Zip disks, or
    2. create a personal subfolder and transfer the images into it.
  5. Do not use the following programs,
    1. Picture Easy Transfer which is found in the System Tray on the bottom right works but is agonisingly slow even when using the USB connector. Avoid this.
    2. The transfer function in the Picture Easy Software performs just as well as its sibling, the Picture Easy Transfer mentioned above. Both of these programs are best left in the hands of those who find joy in watching the grass in their lawn grow.
    3. You will also find the My Digital Camera folder when you open up My Computer or Windows Explorer. This program was designed for other digital cameras and does not work with the Kodak DC240 Zoom, so don't waste your time with this.
    4. Do not use the method of transferring (Copying or Cut & Paste) as suggested by the on-line help when using My Computer or Windows Explorer. It doesn't work either.

Deleting Image Files from the Camera Memory Pack

Before returning the camera to the Medical Staff Secretary, it would be appreciated if you could delete all the image files in the camera memory pack so that the next user has the full use of the space available in the memory pack. Make sure that all the images that you want to keep are already uploaded into the computer or other storage media.
  1. Set the Mode dial to Review.
  2. Slide the Power switch to the right.
  3. Press the Menu button just above the top-left hand corner of the LCD panel on the back of the camera.
  4. Use the Up/Down button to the right of the LCD panel to select the Trash-Can icon.
  5. Press Do-It (the button between the Up and Down buttons)
  6. Press the Up/Down button to select the All Pictures option.
  7. Press Do-It.
  8. Switch off the camera by pushing the Power switch to the right again.
Incidentally, the delete functions in the installed software, do not reliably delete the files in the camera and so this is the best way to do it.


https://drsjmc.tripod.com/index.htm
Created:- 07 July 1999
Last Updated:- 29 May 2000
Author:- nkw